Better-Than-Takeout chicken loaded fries with teriyaki chicken and caramelized onions for Busy Weeknights
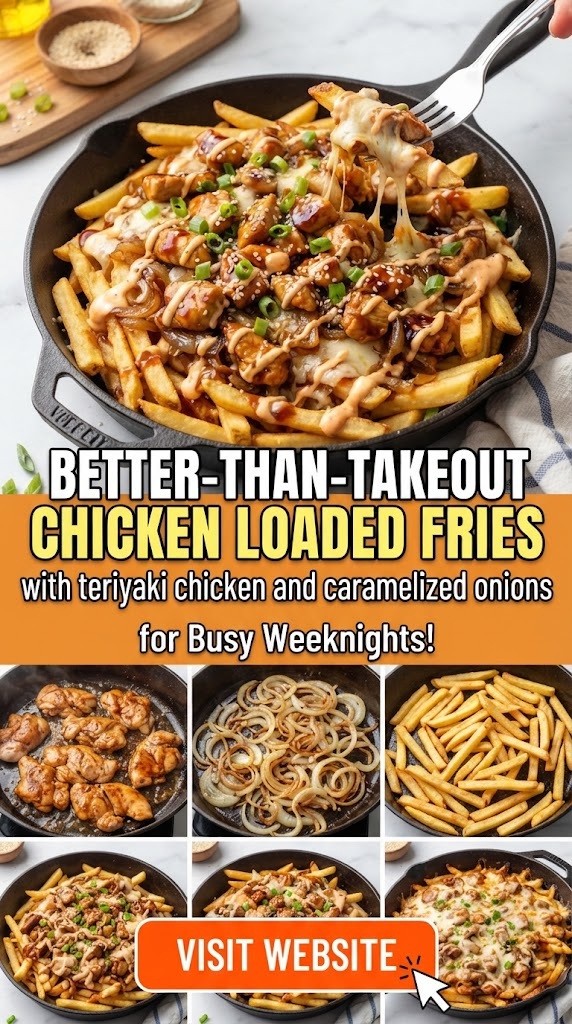
Better-Than-Takeout Teriyaki Chicken Loaded Fries with Caramelized Onions
If you love crispy loaded fries, juicy teriyaki chicken, sweet caramelized onions, and plenty of creamy, savory sauce, this is the ultimate better-than-takeout dinner.
The beauty of this recipe is that it tastes like something you’d order from a restaurant, but it can be made in your own kitchen without complicated techniques. Crispy fries are piled high with tender pieces of glazed teriyaki chicken, slowly caramelized onions, melted cheese, fresh green onions, and a drizzle of creamy spicy mayo.
It is hearty, indulgent, family-friendly, and especially perfect for those evenings when you want something exciting but don’t want to spend hours cooking.
The recipe is also flexible. You can use frozen fries for maximum convenience, homemade fries if you have more time, chicken thighs for extra juiciness, or chicken breast for a leaner option.
Why You’ll Love These Loaded Fries
Better than takeout: You get all the sweet, salty, savory flavors of restaurant-style teriyaki chicken without ordering delivery.
Busy-weeknight friendly: Frozen fries and a quick homemade teriyaki sauce keep the preparation manageable.
Big flavor: The combination of caramelized onions, sticky teriyaki glaze, crispy potatoes, cheese, and creamy sauce is incredibly satisfying.
Customizable: Add jalapeños, sesame seeds, cabbage, pickled onions, avocado, or your favorite toppings.
Great for sharing: Put everything on one large platter and let everyone dig in.
Ingredients
For the Crispy Fries
- 2 pounds frozen French fries
- 1 tablespoon neutral cooking oil, such as vegetable, canola, or avocado oil
- ½ teaspoon fine salt, optional
- ¼ teaspoon freshly ground black pepper
- ½ teaspoon garlic powder
- ½ teaspoon paprika
You can use straight-cut, shoestring, crinkle-cut, steak fries, or waffle fries.
For the best loaded fries, choose fries that become very crisp on the outside because they need to support the chicken and toppings without becoming immediately soggy.
For the Teriyaki Chicken
- 1½ pounds boneless, skinless chicken thighs
- 1 tablespoon neutral cooking oil
- ½ teaspoon salt
- ½ teaspoon black pepper
- ½ teaspoon garlic powder
- ½ teaspoon onion powder
Homemade Teriyaki Sauce
- ½ cup low-sodium soy sauce
- ¼ cup water
- 3 tablespoons brown sugar
- 2 tablespoons honey
- 1 tablespoon rice vinegar
- 1 tablespoon sesame oil
- 2 cloves garlic, finely minced
- 1 teaspoon freshly grated ginger
- 1 tablespoon cornstarch
- 2 tablespoons cold water
The cornstarch and cold water are mixed together separately to make a slurry that thickens the sauce.
For the Caramelized Onions
- 2 large yellow onions
- 1½ tablespoons butter
- 1 tablespoon olive oil
- ¼ teaspoon salt
- 1 teaspoon brown sugar, optional
- 1 tablespoon water, if needed during cooking
Don’t rush the onions. Their slow cooking creates a naturally sweet, deeply savory flavor that balances the salty teriyaki sauce beautifully.
For the Cheese
- 1½ cups shredded Monterey Jack cheese
- 1 cup shredded mozzarella
- ½ cup shredded cheddar cheese
You can use just one cheese if you prefer, but the combination gives you excellent melting, flavor, and texture.
For the Spicy Mayo
- ½ cup mayonnaise
- 2 tablespoons sriracha
- 1 teaspoon rice vinegar
- ½ teaspoon honey
- 1 teaspoon water, or more as needed
Mix everything together until smooth.
For a milder sauce, reduce the sriracha to 1 tablespoon.
For Garnishing
- 3 green onions, thinly sliced
- 1 tablespoon toasted sesame seeds
- 1–2 tablespoons finely chopped cilantro
- 1 fresh jalapeño, thinly sliced, optional
- 1 tablespoon crispy fried onions, optional
You can also add pickled jalapeños, shredded cabbage, or a little extra sriracha.
Equipment
You’ll need:
- Large skillet
- Small saucepan
- Large baking sheet
- Parchment paper, optional
- Cutting board
- Sharp knife
- Mixing bowls
- Whisk
- Wooden spoon or spatula
- Tongs
- Measuring spoons and cups
Step 1: Prepare the Caramelized Onions
Start with the onions because they take the longest.
Peel the onions and cut them in half from root to tip.
Place each half flat-side down and slice into thin, even strips.
Try to keep the slices relatively uniform so they cook at the same rate.
Heat a large skillet over medium-low heat.
Add:
- 1½ tablespoons butter
- 1 tablespoon olive oil
Once the butter melts, add the sliced onions.
Sprinkle with ¼ teaspoon salt.
Stir everything together.
Cook the onions uncovered for approximately 5 minutes, stirring occasionally.
They will begin to soften.
Reduce the heat to low.
Continue cooking for another 20–30 minutes, stirring every few minutes.
The onions will gradually change from white to translucent, then pale golden, and finally deep golden brown.
If the onions begin sticking to the pan or browning too quickly, add 1 tablespoon water and scrape the bottom of the pan with a wooden spoon.
Continue cooking.
For an especially sweet flavor, stir in 1 teaspoon brown sugar during the final 5 minutes.
You don’t have to add sugar—the onions naturally become sweet during caramelization—but it can help create a more takeout-style flavor.
How to Know They’re Done
Perfect caramelized onions should be:
- Deep golden brown
- Very soft
- Sweet and savory
- Almost jam-like
- Not burnt
Set them aside once finished.
Step 2: Make the Teriyaki Sauce
While the onions cook, prepare the sauce.
In a small saucepan, combine:
- ½ cup soy sauce
- ¼ cup water
- 3 tablespoons brown sugar
- 2 tablespoons honey
- 1 tablespoon rice vinegar
- 1 tablespoon sesame oil
- 2 minced garlic cloves
- 1 teaspoon grated ginger
Place the saucepan over medium heat.
Whisk until the brown sugar dissolves.
Bring the mixture to a gentle simmer.
Do not boil it aggressively.
In a small bowl, combine:
- 1 tablespoon cornstarch
- 2 tablespoons cold water
Whisk until completely smooth.
This is your cornstarch slurry.
Slowly pour the slurry into the simmering teriyaki sauce while whisking continuously.
Cook for approximately 1–2 minutes.
The sauce should become glossy and noticeably thicker.
Remove from the heat.
Taste it carefully.
If you want it sweeter, add another teaspoon of honey.
If it is too sweet, add a small splash of rice vinegar.
If it is too thick, whisk in 1–2 tablespoons water.
Set aside.
Step 3: Prepare the Chicken
Pat the chicken thighs dry with paper towels.
This is important because removing excess moisture helps the chicken brown instead of steaming.
Cut the chicken into approximately 1-inch bite-sized pieces.
Place the chicken in a bowl.
Add:
- ½ teaspoon salt
- ½ teaspoon black pepper
- ½ teaspoon garlic powder
- ½ teaspoon onion powder
Toss well.
Step 4: Cook the Chicken
Heat a large skillet over medium-high heat.
Add 1 tablespoon neutral cooking oil.
When the oil is hot, add the chicken in a single layer.
Don’t overcrowd the pan.
If necessary, cook the chicken in two batches.
Let the chicken cook undisturbed for approximately 3–4 minutes.
This allows the bottom to develop a golden-brown crust.
Turn the pieces and continue cooking for another 4–5 minutes.
The chicken should be browned on the outside and cooked through.
For food safety, chicken should reach an internal temperature of 165°F / 74°C at the thickest pieces.
Once cooked, reduce the heat to medium-low.
Pour approximately ¾ of the teriyaki sauce over the chicken.
Toss thoroughly.
Cook for another 1–2 minutes, allowing the sauce to cling to the chicken.
The chicken should become glossy, sticky, and deeply flavorful.
Remove from the heat.
Reserve the remaining teriyaki sauce for drizzling over the finished fries.
Step 5: Cook the Fries
While your chicken is cooking, prepare the fries according to the package directions.
For particularly crispy fries, preheat the oven to:
425°F / 220°C
If using a convection oven or air fryer, you can generally use approximately:
400°F / 205°C
Spread the frozen fries across a large baking sheet.
Don’t pile them on top of each other.
Crowding causes the potatoes to steam instead of crisp.
Toss with:
- 1 tablespoon oil
- ½ teaspoon garlic powder
- ½ teaspoon paprika
- ¼ teaspoon black pepper
Add salt according to how salty your fries are already.
Bake for approximately 25–35 minutes, depending on the type and thickness of fries.
Flip them halfway through cooking.
For extra-crispy fries, give them an additional 3–5 minutes at the end.
Air Fryer Method
Place the fries in the air fryer basket in a relatively loose layer.
Cook at approximately 400°F / 205°C for 15–20 minutes, shaking the basket several times.
The exact time depends on the fries and your air fryer.
You want them deeply golden and crisp.
Step 6: Make the Spicy Mayo
While the fries cook, make the sauce.
Add to a bowl:
- ½ cup mayonnaise
- 2 tablespoons sriracha
- 1 teaspoon rice vinegar
- ½ teaspoon honey
Whisk until smooth.
Add water, about ½ teaspoon at a time, until the sauce becomes easy to drizzle.
Transfer it to a squeeze bottle if you have one.
Otherwise, simply drizzle it from a spoon.
Taste.
For more heat, add additional sriracha.
For a sweeter sauce, add another ½ teaspoon honey.
Step 7: Prepare the Cheese
Shred the cheese if you haven’t already.
Freshly shredded cheese usually melts better than pre-shredded cheese.
Combine:
- Monterey Jack
- mozzarella
- cheddar
in a bowl.
Set aside.
Step 8: Assemble the Loaded Fries
This is where everything comes together.
Keep the fries on the baking sheet or transfer them to a large oven-safe platter.
Make sure they’re spread into a reasonably even layer.
Scatter approximately half of the cheese over the fries.
Add the caramelized onions.
Then distribute the teriyaki chicken evenly across the fries.
Add the remaining cheese.
Place the tray back into the oven at approximately 425°F / 220°C for 3–5 minutes.
You only need enough time for the cheese to melt.
Don’t leave it in too long, because the fries can lose their crispness.
Remove from the oven.
Step 9: Add the Final Toppings
Immediately drizzle the fries with:
- Spicy mayo
- Remaining teriyaki sauce
Then sprinkle over:
- Sliced green onions
- Toasted sesame seeds
- Chopped cilantro
Add sliced jalapeños if you want some heat.
For extra crunch, finish with crispy fried onions.
Serve immediately.
These fries are at their absolute best during the first few minutes after assembly, when the potatoes are still crisp and the cheese is hot and stretchy.
Complete Cooking Timeline
For a busy weeknight, here’s an efficient order:
0:00
Preheat oven to 425°F / 220°C.
0:05
Slice onions and start caramelizing them.
0:10
Mix teriyaki sauce.
0:15
Cut and season chicken.
0:20
Put fries in the oven.
0:25
Cook chicken.
0:35
Finish teriyaki chicken.
0:40
Make spicy mayo.
0:45
Finish caramelized onions.
0:50
Assemble fries with cheese, chicken, and onions.
0:55
Melt cheese.
1:00
Add sauces and toppings.
Total time: approximately 55–65 minutes.
If you’re using ready-made caramelized onions and an air fryer for the fries, you can reduce the active cooking time considerably.
The Secret to Really Crispy Loaded Fries
The biggest problem with loaded fries is sogginess.
Here’s how to prevent it.
1. Don’t overcrowd the fries
Give the fries plenty of space on the baking sheet.
2. Cook them until very crisp
Don’t stop cooking when they’re merely golden. They need enough structure to support the toppings.
3. Drain excess sauce from the chicken
The chicken should be glazed, not swimming in teriyaki sauce.
4. Add sauces at the very end
Don’t pour teriyaki sauce and spicy mayo over the fries before baking.
Add them after the cheese has melted.
5. Serve immediately
Loaded fries are not a dish that improves by sitting around.
Can You Use Chicken Breast?
Absolutely.
Chicken thighs are my first choice because they stay juicy and work beautifully with the sweet teriyaki glaze.
However, chicken breast works very well.
Use:
1½ pounds boneless, skinless chicken breast
Cut it into small pieces.
Because breast meat is leaner, avoid overcooking it.
Cook until the chicken reaches 165°F / 74°C, then immediately coat it with the sauce.
Can You Use Store-Bought Teriyaki Sauce?
Yes.
For the fastest possible weeknight version, use approximately:
¾ cup prepared teriyaki sauce
Simply cook the chicken and add the sauce during the final few minutes.
However, homemade sauce is worth making because it takes only a few minutes and allows you to control the sweetness and saltiness.
How to Make It Spicier
If you love heat, try adding:
- Extra sriracha
- Fresh jalapeños
- Chili flakes
- Chili crisp
- A drizzle of hot sauce
- Thinly sliced Thai chilies
A particularly good combination is spicy mayo plus chili crisp.
How to Make It Less Spicy
For a family-friendly version:
- Reduce sriracha to 1 teaspoon
- Leave out jalapeños
- Use regular mayonnaise instead of spicy mayo
- Add a little extra honey
The teriyaki chicken itself is sweet and savory rather than spicy.
Delicious Optional Toppings
You can turn these fries into a completely different meal by changing the toppings.
Try:
Pickled Red Onions
Their acidity cuts through the richness of the cheese and mayo.
Shredded Cabbage
Adds freshness and crunch.
Avocado
Creamy avocado works particularly well with spicy mayo.
Pineapple
Small pieces of grilled or fresh pineapple add a sweet tropical element.
Crispy Bacon
For an extra-indulgent version, sprinkle cooked chopped bacon over the finished fries.
Fried Egg
Add a sunny-side-up egg on top for a substantial brunch-style version.
Kimchi
For a Korean-inspired variation, add chopped kimchi immediately before serving.
Make-Ahead Instructions
You can prepare several components ahead of time.
Chicken
Cook the teriyaki chicken up to 3 days ahead.
Store it in an airtight container in the refrigerator.
Reheat gently in a skillet or microwave.
Caramelized Onions
These are excellent for meal prep.
Make them up to 4–5 days ahead.
Store covered in the refrigerator.
Teriyaki Sauce
Prepare the sauce several days ahead and refrigerate it in an airtight container.
Reheat gently before serving.
Spicy Mayo
Make the spicy mayo ahead and refrigerate.
Give it a good stir before using.
Fries
For the best texture, cook the fries immediately before assembling.
Storage
Loaded fries are best eaten immediately, but leftovers can be stored.
Place leftover chicken and toppings in separate airtight containers whenever possible.
Refrigerate within approximately 2 hours of cooking.
The chicken and caramelized onions can generally be kept refrigerated for several days.
The fries themselves will soften in the refrigerator, so don’t expect them to retain their original crispness.
How to Reheat Leftovers
Avoid microwaving the fully assembled fries if you want good texture.
Instead:
- Separate the chicken and toppings from the fries if possible.
- Reheat the fries in an oven or air fryer until crisp.
- Warm the chicken separately.
- Reassemble everything.
- Add fresh spicy mayo and green onions.
For the fries, an oven around 400–425°F / 205–220°C works well.
An air fryer is even better for restoring crispness.
Meal-Prep Version
For four meal-prep servings, prepare:
- Teriyaki chicken
- Caramelized onions
- Teriyaki sauce
- Spicy mayo
Store these separately.
When ready to eat, prepare a fresh portion of fries and top with the reheated chicken and onions.
This gives you the convenience of meal prep without having soggy potatoes sitting in the refrigerator for several days.
Ingredient Substitutions
Soy Sauce
Use tamari for a gluten-free option, provided the other ingredients are also suitable for your dietary requirements.
Brown Sugar
Use coconut sugar or granulated sugar.
Honey
Maple syrup works well.
Rice Vinegar
Use apple cider vinegar in a pinch, although the flavor will be slightly different.
Sesame Oil
You can omit it, but it adds an important toasted sesame character.
Monterey Jack
Use pepper Jack, mozzarella, provolone, or another good melting cheese.
Chicken
Turkey can work as a substitute, or you can use tofu for a vegetarian variation.
Vegetarian Version
Replace the chicken with crispy tofu.
Press approximately 14 ounces of extra-firm tofu to remove excess moisture.
Cut into cubes.
Toss with:
- 1 tablespoon cornstarch
- ½ teaspoon garlic powder
- ½ teaspoon paprika
- ¼ teaspoon black pepper
- 1 tablespoon oil
Pan-fry until crisp, then toss with the teriyaki sauce.
Build the fries exactly as described.
Gluten-Free Version
Use certified gluten-free fries and replace regular soy sauce with gluten-free tamari.
Check the labels of your teriyaki sauce, mayonnaise, seasonings, and other packaged ingredients as well.
How Many People Does This Serve?
This recipe makes approximately 4 generous servings as a main dish.
For a party appetizer, it can serve approximately 6–8 people.
If you’re feeding a larger group, simply double the recipe.
When doubling, use two baking sheets for the fries rather than putting twice as many fries onto one tray.
Nutrition and Portion Considerations
These are deliberately indulgent loaded fries, so the exact nutritional values will vary significantly depending on the type of fries, cheese, mayonnaise, and amount of sauce used.
For a lighter version:
- Use less cheese
- Choose baked fries
- Use chicken breast
- Reduce mayonnaise
- Add shredded cabbage or fresh vegetables
- Use more chicken and fewer fries
- Serve smaller portions alongside a salad
For the classic restaurant-style experience, however, don’t be afraid to embrace the cheese and sauce.
Chef’s Tips for the Best Teriyaki Chicken Loaded Fries
Use chicken thighs when possible. They are forgiving and stay juicy.
Don’t rush caramelized onions. Low and slow creates much better flavor than cooking them quickly over high heat.
Use low-sodium soy sauce. This gives you more control over the final salt level.
Taste your sauce before adding it to the chicken. Different soy sauces vary substantially in saltiness.
Cook fries separately from wet ingredients. Crisp fries are essential.
Shred your own cheese. It tends to melt more smoothly.
Don’t drown the fries. A drizzle of sauce gives you much better texture than pouring on a large amount.
Serve immediately. That’s when the contrast between crispy potatoes, sticky chicken, melted cheese, sweet onions, and cool spicy mayo is at its best.
Frequently Asked Questions
Can I use frozen fries?
Yes. In fact, frozen fries are one of the best shortcuts for this recipe.
Choose a variety designed to become crispy in the oven or air fryer.
Can I make the teriyaki chicken ahead?
Yes. Cook it ahead and refrigerate it in an airtight container. Reheat it gently before assembling the fries.
Why did my fries become soggy?
Usually because they weren’t crisp enough initially or because too much liquid was added.
Cook the fries until deeply crisp and add the sauces immediately before serving.
Can I use bottled teriyaki sauce?
Absolutely. It is an excellent shortcut for busy nights.
Can I use an air fryer?
Yes. Air-fried fries work particularly well for loaded fries because they can become very crisp.
Can I make this without cheese?
Yes. The dish will still be delicious with teriyaki chicken, caramelized onions, spicy mayo, sesame seeds, and green onions.
Can I make it ahead for a party?
Prepare the chicken, onions, sauces, and toppings ahead. Cook and assemble the fries shortly before serving.
The Perfect Serving Combination
For the ultimate plate, build it in this order:
Crispy fries → melted cheese → caramelized onions → teriyaki chicken → more cheese → teriyaki drizzle → spicy mayo → green onions → sesame seeds → jalapeños.
That layering matters.
You want some toppings to melt into the fries while others remain fresh on top.
Every bite should contain a little bit of crispy potato, sticky chicken, sweet onion, creamy cheese, and sauce.
Final Recipe Card
Better-Than-Takeout Teriyaki Chicken Loaded Fries
Servings: 4 generous servings
Prep time: 20 minutes
Cook time: 35–45 minutes
Total time: approximately 55–65 minutes
Ingredients
Fries
- 2 lb frozen French fries
- 1 tbsp neutral oil
- ½ tsp garlic powder
- ½ tsp paprika
- ¼ tsp black pepper
- Salt as needed
Chicken
- 1½ lb boneless skinless chicken thighs
- 1 tbsp neutral oil
- ½ tsp salt
- ½ tsp black pepper
- ½ tsp garlic powder
- ½ tsp onion powder
Teriyaki sauce
- ½ cup low-sodium soy sauce
- ¼ cup water
- 3 tbsp brown sugar
- 2 tbsp honey
- 1 tbsp rice vinegar
- 1 tbsp sesame oil
- 2 garlic cloves, minced
- 1 tsp grated ginger
- 1 tbsp cornstarch
- 2 tbsp cold water
Caramelized onions
- 2 large yellow onions
- 1½ tbsp butter
- 1 tbsp olive oil
- ¼ tsp salt
- 1 tsp brown sugar, optional
Cheese
- 1½ cups Monterey Jack
- 1 cup mozzarella
- ½ cup cheddar
Spicy mayo
- ½ cup mayonnaise
- 2 tbsp sriracha
- 1 tsp rice vinegar
- ½ tsp honey
- 1 tsp water
Toppings
- 3 green onions
- 1 tbsp sesame seeds
- 1–2 tbsp cilantro
- 1 jalapeño, optional
- Crispy fried onions, optional
Directions
- Caramelize the onions: Slice onions thinly. Cook with butter, olive oil, and salt over medium-low heat for 5 minutes, then low heat for 20–30 minutes until deeply golden and soft.
- Make the teriyaki sauce: Combine soy sauce, water, brown sugar, honey, vinegar, sesame oil, garlic, and ginger. Simmer gently. Whisk cornstarch with cold water, add to sauce, and cook 1–2 minutes until glossy and thick.
- Season chicken: Cut chicken into bite-sized pieces and season with salt, pepper, garlic powder, and onion powder.
- Cook chicken: Heat oil in a skillet over medium-high heat. Brown chicken for approximately 7–9 minutes, turning occasionally, until it reaches 165°F/74°C internally.
- Glaze chicken: Add approximately ¾ of the teriyaki sauce and toss for 1–2 minutes until sticky and glossy.
- Cook fries: Bake at 425°F/220°C according to package directions, usually 25–35 minutes, turning halfway. Cook until very crisp.
- Make spicy mayo: Whisk mayonnaise, sriracha, rice vinegar, honey, and water together.
- Assemble: Spread hot fries on a baking sheet. Add half the cheese, caramelized onions, teriyaki chicken, and remaining cheese.
- Melt: Return to the 425°F/220°C oven for 3–5 minutes until the cheese melts.
- Finish: Drizzle with spicy mayo and remaining teriyaki sauce. Garnish with green onions, sesame seeds, cilantro, jalapeños, and crispy onions.
- Serve immediately.
The result: ultra-crispy fries loaded with juicy sticky teriyaki chicken, sweet caramelized onions, gooey melted cheese, creamy spicy mayo, and fresh sesame-green-onion toppings—a restaurant-style dinner that is completely doable on a busy weeknight.