Dog First Aid Kit Checklist – 9 Items You’re Missing
The Ultimate Dog First Aid Kit Checklist: 9 Life-Saving Items You’re Probably Missing.
Most pet owners believe they are prepared because they have a box of Band-Aids and some old gauze in a drawer. However, canine physiology is different from human physiology, and the emergencies dogs face require specific tools.
If you bought a pre-packaged pet first aid kit from a big-box store, you might feel a false sense of security. Many of those kits are filled with “filler” items like dozens of plastic gloves but lack the critical supplies needed for a true life-or-death situation.
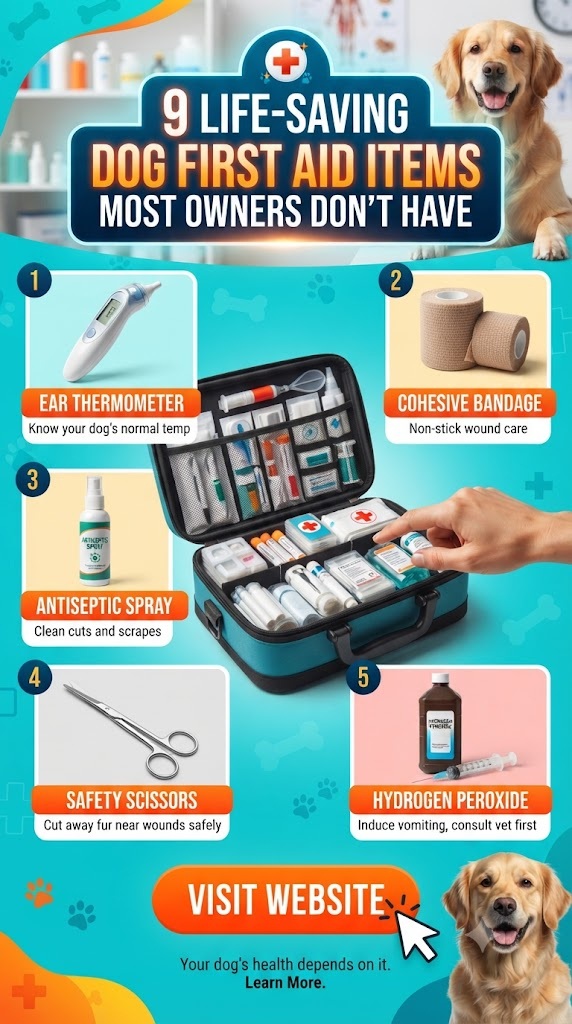
Here is the definitive guide to building a professional-grade dog first aid kit, featuring the 9 critical items you are likely missing—and exactly how to use them.
1. The “Soft” Muzzle: Safety for the Savior
It is a hard truth to swallow: even the gentlest, sweetest dog in the world may bite when they are in extreme pain or shock. This is a survival instinct, not a reflection of your dog’s temperament. When a dog is injured, their brain enters a “fight or flight” state. If you are trying to stabilize a broken limb or clean a deep wound, your dog may lash out.
Why you’re missing it: Most people assume their dog would never bite them. They think a muzzle is for “aggressive” dogs. In a first aid context, a muzzle is a safety tool that allows you to provide care without becoming a patient yourself.
What to look for:
- Nylon or Mesh: These are lightweight and easy to fold into a kit.
- Proper Sizing: Ensure it fits your dog’s snout specifically.
- Note: Never muzzle a dog that is vomiting, having difficulty breathing, or is unconscious.
Pro Tip: If you don’t have a muzzle, you can use a roll of gauze or a soft leash to create a temporary “figure-eight” muzzle, but having a dedicated one in your kit saves precious seconds.
2. A Digital Rectal Thermometer (and Lubricant)
You cannot tell if a dog has a fever or is suffering from heatstroke by feeling their nose. A dog’s “normal” temperature is higher than a human’s (typically 101.0 to 102.5°F). If your dog is lethargic or has been running in the sun, knowing their exact internal temperature is the difference between a quick cool-down and a frantic trip to the ER.
Why you’re missing it: It’s unpleasant. Most owners rely on the “wet nose” myth, which is dangerously inaccurate.
How to use it:
- Apply a water-based lubricant (like K-Y Jelly) to the tip.
- Gently insert the thermometer about an inch into the rectum.
- Wait for the beep.
- Critical Thresholds: A temperature over 104°F is an emergency (heat exhaustion/stroke). A temperature below 99°F can indicate shock or hypothermia.
3. Styptic Powder (The “Quick” Fix)
If you’ve ever accidentally cut your dog’s nail too short, you know how much it can bleed. The “quick” is a blood vessel, and once it’s nicked, it can be notoriously difficult to stop. This becomes an even bigger issue if your dog tears a nail while running on pavement or through the woods.
Why you’re missing it: Most people think flour or cornstarch is just as good. While those can work in a pinch, professional styptic powder (like Kwik Stop) contains benzocaine to help with the pain and an iron-based clotting agent that works instantly.
How to use it: Take a pinch of the powder and press it firmly against the bleeding nail. Hold it for 5–10 seconds. The bleeding should stop immediately.
4. 3% Hydrogen Peroxide (With Strict Instructions)
This is perhaps the most controversial yet essential item in a dog first aid kit. Its primary purpose in a pet emergency is not cleaning wounds (which can actually damage tissue), but inducing vomiting.
Why you’re missing it: You might have it in your medicine cabinet, but is it in your dog’s travel kit? Also, do you know the dosage?
When to use it: Only use this if your dog has ingested a toxin (like chocolate, grapes, or certain plants) AND you have been instructed to do so by a veterinarian or Poison Control.
- The Dosage: Generally 1 teaspoon per 5 pounds of body weight.
- Warning: NEVER induce vomiting if the dog has swallowed something caustic (like bleach), something sharp, or if they are already lethargic or unconscious.
5. Self-Adhering Bandage Wrap (Vet Wrap)
Human Band-Aids are useless on dogs. They don’t stick to fur, and if they do, they are painful to remove. Furthermore, a dog will lick or chew off a standard bandage in seconds.
Why you’re missing it: You might be relying on medical tape. Medical tape sticks to hair and causes “clipper burn” style irritation when removed.
Why Vet Wrap is superior:
- It sticks to itself, not the fur.
- It provides compression, which is vital for stopping bleeding.
- It is somewhat water-resistant.
- It’s difficult (though not impossible) for a dog to chew off quickly.
Safety Note: Always place a layer of gauze underneath Vet Wrap. Be extremely careful not to wrap it too tight, as it can act as a tourniquet and cut off circulation. You should always be able to fit two fingers under the bandage.
6. Saline Eye and Wound Wash
If your dog gets sand in their eye at the beach, or a splash of a chemical cleaner, or even just dirt in a fresh cut, you need a way to flush the area without causing further irritation.
Why you’re missing it: Many owners think tap water is fine. However, tap water contains chlorine and minerals that can irritate sensitive eye tissue. It also isn’t sterile.
What to buy: Look for a simple, buffered saline solution (sold in the contact lens aisle). Ensure it does not contain redness-relief medication or other additives. A squeeze bottle is best for creating a gentle stream to flush out debris.
7. Diphenhydramine (Benadryl)
Allergic reactions can happen in an instant. A wasp sting on the nose can cause a dog’s face to swell to twice its size, potentially obstructing their airway.
Why you’re missing it: You might have it for your own allergies, but you need a dedicated supply for the dog kit with the correct dosage chart attached.
The Golden Rule: The medication MUST only contain Diphenhydramine.
- DANGER: Many “Allergy/Sinus” versions of Benadryl contain acetaminophen or decongestants, which are toxic to dogs.
- Dosage: The standard dose is 1mg per pound of body weight.
Always consult your vet before administering, but having it on hand can save a dog from anaphylactic shock.
8. An Emergency Foil “Space” Blanket
Shock is a silent killer in canine emergencies. When a dog is severely injured or loses blood, their body temperature drops rapidly. Even in a warm climate, a dog in shock can become hypothermic.
Why you’re missing it: It’s often associated with extreme hikers or survivalists, not “dog people.” However, these blankets are tiny, weigh nothing, and are the most efficient way to retain a dog’s body heat during transport to the vet.
How to use it: Wrap the dog snugly (but leave the face uncovered) to trap body heat. This is also essential if you have a small dog or a dog with a thin coat who gets wet in cold weather.
9. The “Critical Info” Laminated Card
In a crisis, your brain often “frizzes.” You might forget your vet’s phone number, or in the heat of the moment, you can’t remember exactly how much your dog weighs for a medication dosage.
Why you’re missing it: We rely on our phones. But what if your phone is dead, has no signal, or you are too panicked to navigate your contacts?
What to include on the card:
- Your dog’s name and exact weight (updated every 6 months).
- Your primary vet’s phone number and address.
- The nearest 24/7 Emergency Vet Clinic’s address.
- Pet Poison Control Hotline: (888) 426-4435 (ASPCA).
- A list of any medications your dog is currently taking.
- Vaccination records (specifically Rabies, as an ER vet will need this before handling).
Organizing Your Kit: Accessibility is Everything
Having these items is only half the battle. If they are buried in the back of a cluttered closet or scattered across three different rooms, they won’t help you in an emergency.
The Container
Choose a bright-colored, waterproof bag or box. A tackle box or a dedicated “tactical” first aid pouch works wonders. It should be easily identifiable so that if you tell a family member to “go get the dog’s first aid kit,” they know exactly what they are looking for.
Location, Location, Location
Ideally, you should have two kits:
- The Master Kit: Stored in a central location in your home.
- The Travel Kit: A condensed version that stays in your car or your hiking backpack. Emergencies often happen away from home.
Step-by-Step: How to Handle a Common Emergency
To understand why these 9 items are so critical, let’s walk through a common scenario: The Sliced Paw.
- Stay Calm: Your dog mirrors your energy. If you panic, they panic, which increases their heart rate and blood loss.
- Muzzle Up: Even if they aren’t growling, put on that Soft Muzzle (Item #1). A paw injury is incredibly painful, and as you touch the wound, the dog may snap.
- Flush: Use the Saline Wash (Item #6) to clear out dirt and debris so you can see the depth of the cut.
- Stop Bleeding: If it’s a torn nail, use Styptic Powder (Item #3). If it’s a cut on the pad, apply firm pressure with gauze.
- Wrap: Apply a non-stick pad, then wrap it with Vet Wrap (Item #5). Remember: not too tight!
- Check for Shock: Check their gum color (should be pink). If they seem cold or lethargic, wrap them in the Foil Blanket (Item #8).
- Call the Vet: Reference your Info Card (Item #9) for the number and head out.
The “Bonus” Essentials: Don’t Forget the Basics
While the 9 items above are the ones most people miss, your kit still needs the foundational supplies:
- Absorbent Gauze Pads: For cleaning and covering wounds.
- Adhesive Tape: For securing gauze (but not directly to the fur).
- Blunt-Tip Scissors: For cutting bandages or cutting away matted hair/foreign objects stuck in fur without poking the skin.
- Tweezers/Tick Remover: For removing splinters or parasites.
- Collapsible Bowl: To offer water if they are dehydrated.
- Extra Leash and Collar: In case the original is damaged or lost during an accident.
Advanced Preparedness: Skills to Match Your Supplies
A first aid kit is a tool, but you are the operator. Knowing how to use these items is paramount. Consider taking a Pet First Aid and CPR course. Many organizations like the American Red Cross offer online certifications.
How to Check for Dehydration
Pull up the skin between the shoulder blades (the “scruff”). It should snap back instantly. If it stays in a “tent” shape or slides back slowly, your dog is dehydrated.
How to Check Gum Color
Lift your dog’s lip. The gums should be a healthy bubblegum pink.
- White/Pale: Indicates shock or internal bleeding.
- Blue/Purple: Indicates lack of oxygen.
- Bright Red: Indicates heatstroke or carbon monoxide poisoning.
- Yellow: Indicates liver issues.
Seasonal Maintenance: The 6-Month Audit
A first aid kit is not a “set it and forget it” item. Every six months (perhaps when you change your clocks), perform an audit:
- Check Expiration Dates: Hydrogen peroxide loses its “fizz” (and effectiveness) over time once opened. Medications like Benadryl also expire.
- Check Batteries: If you have a flashlight in your kit, make sure it still works.
- Update Weights: If you have a puppy or a dog on a weight-loss journey, update the dosage chart on your info card.
- Restock: Replace any gauze or bandages you used for minor scrapes.
Conclusion: Empowerment Through Preparation
No one wants to imagine their dog in pain. But the reality is that accidents happen. Being “the person with the kit” means the difference between a minor incident and a tragic loss.
By adding these 9 often-overlooked items—the muzzle, the thermometer, the styptic powder, the peroxide, the Vet Wrap, the saline, the antihistamines, the space blanket, and the emergency contact card—you are moving beyond the basic “human-kit-repurposed” and into the realm of true canine emergency preparedness.
Take thirty minutes this weekend. Order the supplies, print out the info card, and build your kit. Your dog can’t thank you in words, but their safety is the greatest gift you can give them.
Is your dog’s kit ready? Don’t wait for the emergency to find out.